In the world of custom manufacturing, engineers and product designers are often stuck between a rock and a hard place. You either pay astronomical tooling costs for injection molding or endure the slow, labor-intensive process of fabricating parts by hand. But what if there was a middle ground? A sweet spot that offers speed, durability, and cost-efficiency without breaking the bank? Enter Vacuum Forming.
This versatile manufacturing process, often overshadowed by its more famous cousins, is the secret engine behind everything from robust medical device enclosures to sleek automotive dashboards. Whether you are scaling up production from a prototype or looking for a lightweight alternative to heavier materials, understanding the process of vacuum forming is critical to making smarter supply chain decisions.
In this guide, we will break down exactly how it works, when you should use it over fiberglass or injection molding, and the design rules you need to follow for a perfect part.
What is Vacuum Forming?
At its core, vacuum forming is a simplified version of thermoforming. It involves heating a sheet of thermoplastic material until it becomes pliable, stretching it over a single-surface mold, and then using a vacuum to suck the sheet tightly against the mold’s surface. Once cooled, the plastic retains the shape of the mold.
Unlike injection molding, which requires complex double-sided molds (a core and a cavity) to force plastic into a shape, vacuum forming only requires one side of the tool. This fundamental difference is why vacuum forming is so cost-effective for low-to-mid-volume production runs.

The “Heavy Gauge” Advantage
While many people associate vacuum forming with thin, disposable packaging (like blister packs), industrial applications rely on Heavy Gauge Vacuum Forming. This uses plastic sheets ranging from 0.060 inches (1.5mm) up to 0.500 inches (12mm) thick. These parts are incredibly durable, structural, and often indistinguishable from injection-molded parts once trimmed and finished.
The Step-by-Step Manufacturing Process
To truly appreciate the value of this method, it helps to understand the mechanics. Here is how we transform a flat sheet of plastic into a complex, 3D component.
1. Clamping and Heating
The process begins by clamping a thermoplastic sheet into a frame. The frame moves into a heating oven, where ceramic or quartz heaters raise the temperature of the plastic. The goal is to reach a “glass transition temperature”, the precise point where the plastic becomes soft and rubbery but hasn’t melted into a liquid. Uniform heating is critical here; if the center is hot but the edges are cool, the part will warp.
2. Forming (The Vacuum Step)
Once the sheet is ready, it is removed from the oven and positioned over the mold. The mold is raised into the sheet (or the sheet is lowered onto the mold), creating a seal around the perimeter. A high-powered vacuum pump is then activated, pulling the air out from between the plastic and the mold. Atmospheric pressure pushes the soft plastic tightly against the tool, capturing every detail.
3. Cooling and Release
Fans or mist sprays are used to cool the plastic rapidly, locking it into its new shape. Once rigid, the vacuum is reversed to create positive pressure (air ejection), which helps pop the part off the mold. This is why having the correct draft angles (more on that later) is essential.
4. Trimming and Finishing
The formed part is removed from the machine as a large sheet containing the 3D shape. The excess plastic around the edges must be trimmed away. For high-precision industrial parts, we use 5-axis CNC routers to cut the final perimeter, drill holes, and cut vents. The result is a clean, ready-to-assemble component.
Vacuum Forming vs. The Competition
One of the most common questions we get is: “Why shouldn’t I just use injection molding?” or “Is this stronger than fiberglass?” The answer depends entirely on your volume and performance needs.

Round 1: Vacuum Forming vs. Injection Molding
Injection molding is king for high volumes (10,000+ parts). But for projects requiring 50 to 5,000 parts per year, vacuum forming is often the superior financial choice.
| Feature | Vacuum Forming | Injection Molding |
|---|---|---|
| Tooling Cost | Low ($2k – $15k typical) | High ($20k – $100k+ typical) |
| Lead Time | Fast (4-6 weeks) | Slow (12-16 weeks) |
| Part Detail | Moderate (One detailed side) | High (Two detailed sides) |
| Economic Volume | 50 – 5,000 units/year | 10,000+ units/year |
The Takeaway: If you are launching a new product and don’t want to risk $50,000 on a steel mold, vacuum forming allows you to enter the market with minimal risk.
Round 2: Vacuum Forming vs. Fiberglass
At BLG, we specialize in both, so we can give you an unbiased comparison. For a deep dive, check out our article on glass fiber vs fiberglass differences, but here is the summary:
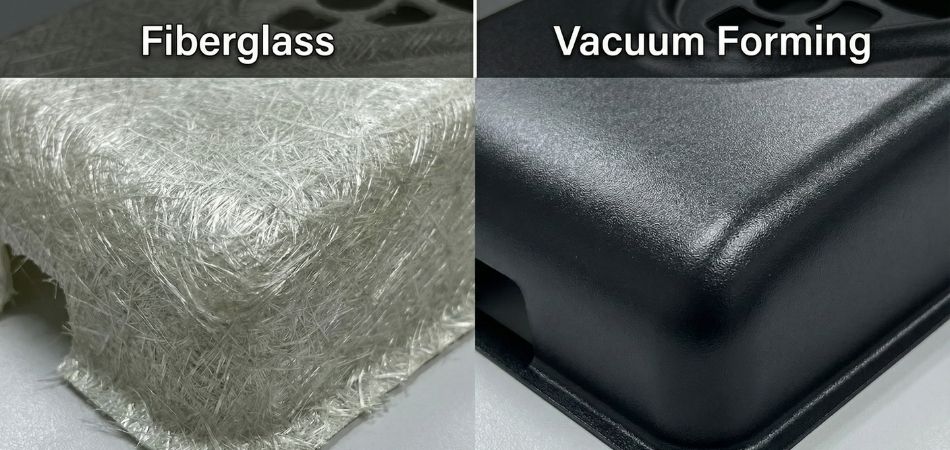
- Weight: Vacuum-formed thermoplastics are significantly lighter than fiberglass. This makes them ideal for vehicle interiors or portable equipment.
- Finish: Plastic sheets can come pre-colored or textured, requiring no painting. Fiberglass almost always requires a Gel Coat or post-mold painting.
- Strength: Fiberglass is stiffer and stronger structurally. If the part needs to support a load (like a wind turbine blade), stick with fiberglass. If it is a cover or enclosure, choose plastic.
Common Materials and Applications
The success of your project often hinges on selecting the right thermoplastic. You can read our full guide on choosing the right thermoplastic sheet, but here are the industry workhorses:
1. ABS (Acrylonitrile Butadiene Styrene)
The most popular material for vacuum forming. It is tough, impact-resistant, and comes in a variety of textures (like “haircell” which hides scratches).
Best for: Vehicle dashboards, luggage, equipment cases.
2. HIPS (High Impact Polystyrene)
Low cost and easy to form. It provides a good balance of stiffness and impact resistance but isn’t as durable as ABS outdoors.
Best for: Point-of-purchase displays, indoor signs, prototyping.

3. Polycarbonate (Lexan)
Extremely high impact strength and temperature resistance. It is virtually unbreakable but more difficult to form due to its tight temperature window.
Best for: Riot shields, heavy machinery guards, skylights.
4. HDPE (High-Density Polyethylene)
Known for its chemical resistance and durability in cold environments. It is waxy and tough to paint or glue, but excellent for rugged use.
Best for: Truck bed liners, chemical tanks, outdoor playground equipment.
Pro Tip: For outdoor applications, always ask for UV-stable material variants. Standard ABS will yellow and become brittle in the sun, but UV-capped ABS (often called ASA) will last for years.
Critical Design Guidelines for Engineers
Vacuum forming has physical limitations. You cannot just take a design meant for injection molding and send it to a vacuum former. To ensure your custom plastic enclosures are manufacturable, follow these three golden rules.
1. Draft Angles are Mandatory
Because the plastic shrinks as it cools, it grips the mold tightly. Without a draft angle (a slight taper on vertical walls), the part will lock onto the tool and may crack during removal.
Rule of Thumb: Use at least 3° to 5° of draft. Deep textures require even more draft.
2. Avoid Undercuts
An undercut is a feature that prevents the part from being pulled straight off the mold (like a lip or a latch). In injection molding, costly “slides” can create these. In vacuum forming, undercuts usually lock the part to the tool. If you need them, they will require expensive “break-away” mold sections or secondary CNC machining after forming.
3. Watch Your Draw Ratio
As the plastic stretches over a tall mold, it thins out, similar to stretching pizza dough. If a part is very tall but very narrow, the top will be thick, but the sides and bottom corners will be paper-thin.
Rule of Thumb: Keep the depth of the part less than the width of the opening. If you need deep draw parts, discuss “plug assist” tooling with your manufacturer.
For more detailed technical data on material properties and design standards, resources like MatWeb offer extensive material data sheets that can help you simulate part performance.
Why BLG Fiberglass for Vacuum Forming?
Many manufacturers only offer one solution. If you go to an injection molder, they will sell you an expensive mold. If you go to a fiberglass shop, they will sell you a heavy hand-laid part.
At BLG, we understand the entire composite and plastic ecosystem. We know when to recommend a fiberglass composite for structural integrity and when to pivot to vacuum forming for cost savings and aesthetics. We handle everything from the initial tool design to the final CNC trimming and assembly.
Ready to Start Your Project With Vacuum Forming?
Don’t let tooling costs kill your product launch. Whether you need a run of 50 custom enclosures or 5,000 automotive components, vacuum forming might be the solution you have been looking for.
Contact our team today for a free consultation, and let’s determine the best manufacturing process for your needs.